🤖 Bot Constructor
Add a Telegram bot to the bot constructor, customize messages and other features of the constructor.
Page Contents
Bot Functionality
ℹ️ What does “functionality” mean?
For a bot to start responding to users, a script must be connected to its token. This script processes incoming messages and sends replies to users.
We provide our workers with a Bot Constructor, which allows you to set up a complete interaction scenario without any programming knowledge.
Connecting a Bot to the Bot Constructor
To connect your bot to the builder, follow these steps:
- In the main menu of our bot, go to 🤖 Bot Constructor —> ➕ Add Bot.
- Select the domain that will be linked to this bot.
- Enter the bot token from BotFather (click).
The token is provided when creating the bot. You can also find it again by sending the command /mybots —> your bot —> Api Token.
Example of a token: 7718084307:AAFj8YgTzkHIqWdKwF3HN2fK5q1aWezLLKg
Configuring a Welcome Message
To make your bot respond to users, navigate to 🤖 Bot Constructor —> your bot —> 📝 Configure responses.
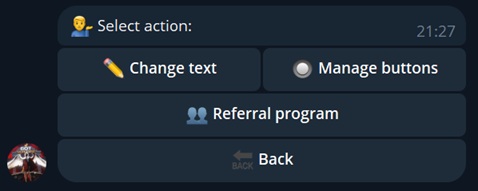
Click "Change text" and send the message that targets will receive.
You can attach files, use formatting, and add variables to your message.
• {first_name} - user’s first name
• {last_name} - user’s last name
• {username} - username without @
• {@username} - username with @
• {telegram_id} - user’s Telegram ID
• {ton} - TON to USD exchange rate

🎲 Random values and calculations:
• {random(x,y)} - random number from x to y
• {1: expression} - store result in label 1
• {2: ^1 * 2} - use label 1’s value
Example Welcome Message
To configure buttons for the welcome message, click 🔙 Back —> 🔘 Manage buttons.
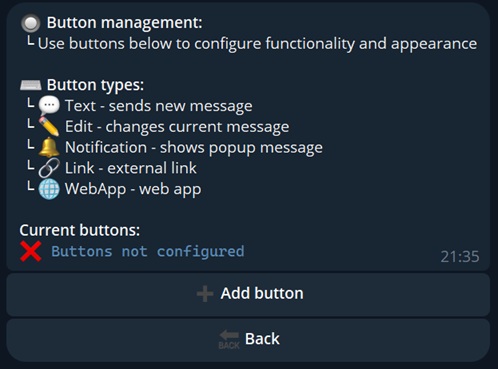
Add the buttons you need. At the very least, we recommend including: a WebApp button and a "Link" button — point it to your official resource.
Example Button Configuration
If it fits your creative concept — we recommend enabling the referral system. Click 🔙 Back —> 👥 Referral program.
The referral system encourages targets to spread your resource under the guise of a reward.
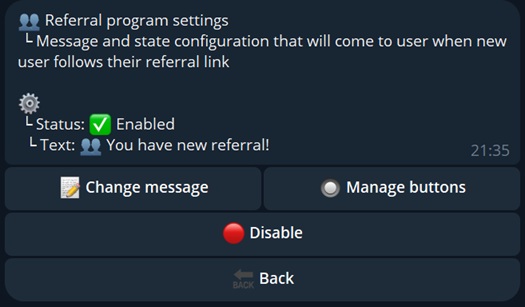
- 📝 Change message — enter the text shown to the user when someone joins using their referral link;
- 🔘 Manage buttons — if needed, add buttons to this message as well.
Add a button with a message that describes your referral program "terms" in the welcome message.
To do this, go to the bot’s main settings menu: 📝 Configure responses —> 🔘 Manage buttons —> ➕ Add Button —> 💬 Text.
Use the variable {referral_link} in your message.
Example Referral Message
Basic bot setup is complete. The bot is now styled and will respond to users with your welcome message.
Example Start Message
⚠️ Attention
By default, the bot is disabled in the constructor. To enable it, go to the bot’s settings main menu and click "🚀 Start"
Constructor Features
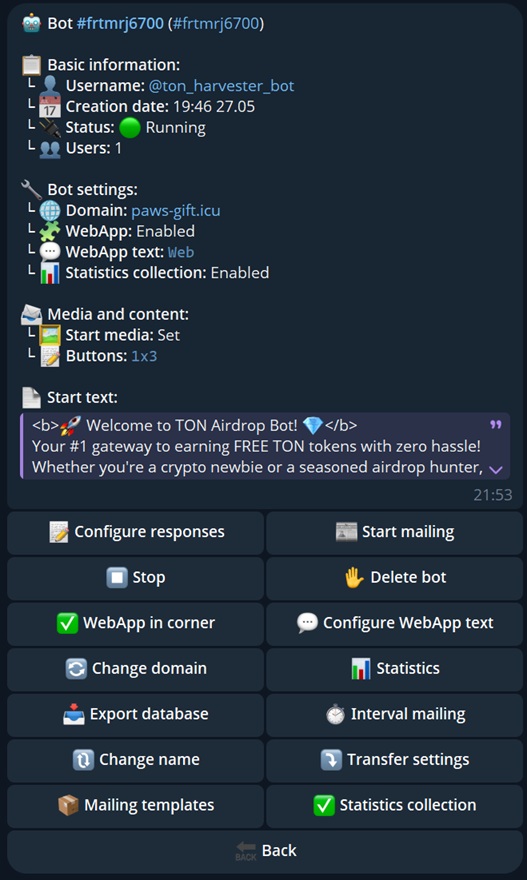
Guide to the features and how to use them in the bot constructor.
📝 Configure responses
Edit the message your bot sends to users.
This is explained in detail in the Configuring the welcome message section.
🚀 Start and ⏹️ Stop
Enable or disable the bot’s token in the constructor.
✋ Delete bot
Permanently removes the bot from the constructor and frees up the slot.
🔄 Change domain
Here you can change the drainer domain linked in the WebApp. Useful if the domain has been blocked.
Full domain replacement process:
- In the bot constructor, click 🔄 Change domain, and select the new one (it must be linked in the domain list).
- Re-add the buttons in 📝 Configure responses.
- To update the domain in the WebApp button, repeat the steps from Extra Settings
📊 Statistics
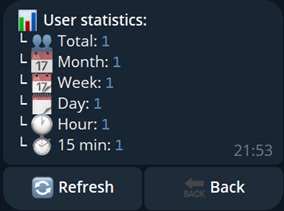
Displays user statistics for your bot.
Note: A domain visit ≠ bot user. If someone visits your domain without starting the bot with the /start message, they won't appear in the stats.
📥 Export database
Downloads the database of all users in CSV format:
user_id,first_name,last_name,username,date_addedUseful if you decide to stop using our constructor and switch to your own solution.
🔃 Change name
Visual setting to rename your bot inside the constructor.
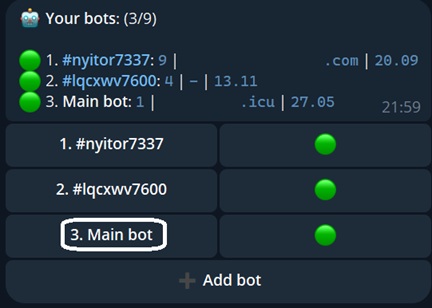
⤵️ Transfer settings
Transfers the constructor settings from one bot entity to another.
Practical example: Your Telegram bot got deleted and you created a new one. Just add the new bot to the constructor and use this feature to copy settings from the old one.
✅ Statistics collection
Here you can enable or disable user tracking in the database.
Attention! When statistics collection is turned off, users who interact with your bot won't be added to the database, meaning you won’t be able to message them later.
This feature is useful if you're simulating bot starts and want to avoid cluttering your database with fake users. Don’t forget to enable stats collection again before launching traffic!
WebApp Features
The bot constructor can manage the WebApp button in the input field by itself.
You don’t need to run the /setmenubutton command in @BotFather, as explained in Extra Settings.
- ✅ WebApp in corner — toggles WebApp button visibility.
- 💬 Configure WebApp text — changes the button text.

Mailing
ℹ️ What are mailings?
Mailings are messages sent to Telegram users by your bot.
The purpose of a mailing is to bring the victim back to your drainer offer. To receive a message, the user must be in your bot’s database. If statistics collection is enabled, this happens automatically when the user sends the /start command.
⚠️ Warning
If you use variables in your message, do not format them. For example, {@username} will not resolve to the user’s @Username if it's bolded.
Avoid formatting variables!
📰 Start mailing
Use this option to launch a one-time broadcast to all users.
You must enter the message (supports formatting, variables, attachments), optionally configure buttons, and then confirm sending.
Example of a mailing
⏱️ Interval mailing
This feature allows you to set up automated mailings based on a defined time interval.
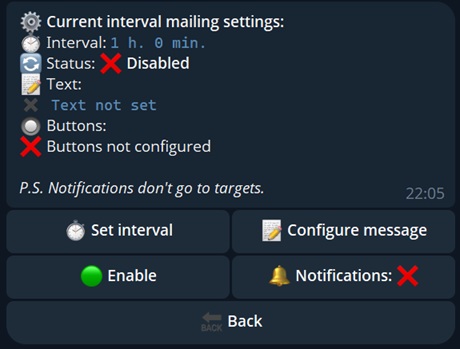
- ⏱️ Set interval — specify how often the interval mailing should occur;
- 📝 Configure message — enter the mailing message (supports formatting, variables, attachments);
- 🟢 Enable / 🛑 Disable — turn interval mailing on or off;
- 🔕 / 🔔 — send the mailing silently (without a notification) or with a notification.
📦 Mailing templates
In this section, you can manage mailing templates.
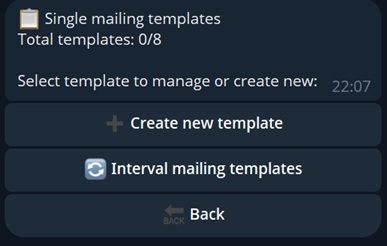
Single mailing templates. Switch the template type, enter a name and a message (supports formatting, variables, attachments).
A template will be created. You can launch a mailing based on it with a single click.Interval mailing templates. Switch the template type, enter a name and a message (supports formatting, variables, attachments).
A template will be created. You can insert its message into the interval mailing (interval and notification settings are taken from the interval mailing settings) with a single click.