✅ Settings Guide
This guide outlines the configuration and capabilities of SOL Drainer. You'll learn how to begin by creating a compelling offer.
Page Contents
Domains
ℹ️ What is a domain?
A domain is a unique name used to identify a website on the internet. It serves as an address users can use to access your site and consists of several segments separated by dots.
For example, in the address example.com, example is the domain name, and .com is the domain extension.
To operate SOL Drainer, you’ll need to connect a domain in our bot. You can choose between using a “shared” domain or a private one.
Shared domains:
- Free, no purchase or additional steps required.
- Higher risk of being blocked, as multiple workers might be using the same domain.
- You can’t choose a custom domain name. You pick from a preset list.
Private domains:
- Require purchase and configuration. You’ll need to set NS records through your domain registrar.
- You can select any available domain name and extension.
- Minimal risk of domain blocking.
The next section explains how to purchase a domain. If you're using a shared domain, no purchase is required.
Purchasing a domain
🚧 Watch out for banned keywords!
Avoid domains with obvious banned words such as “airdrop”, “free”, “reward”, and similar terms. Domains like solana-airdrop2 tend to get blocked almost instantly.
Domains containing banned keywords will not be accepted by our bot.
We recommend using Telegram bots for purchasing domains. These bots are anonymous, and you can use your main account for transactions.
Suggested bots for domain purchase:
Standard domains:
- @FastDomainBot — the purchase process will be shown using this bot.
Bulletproof domains:
- @BPdomains_bot — abuse-resistant, great for direct traffic.
Domain purchase example
- Open @FastDomainBot and send the command /start.
- Tap the button Buy Domain ⚡️.
- Enter the domain name you wish to purchase, e.g.,
sol-award. - Review available domain extensions and pricing. Choose the one that fits your needs.
- Tap Profile 👤 —> Top Up Balance 💰.
- Add funds using your preferred method.
- Return and complete the purchase.
Domains are valid for one year. You can renew them if needed.
Adding a domain
To add a domain and get started, open our bot @RublevkaTeam_bot.
From the main menu, select 🌐 Domains —> ➕ Add Domain

If you're adding a shared domain:
- Tap 👥 Shared
- Select the domain you want to attach your subdomain to.
- Enter your subdomain. Use a single word in lowercase English.
Domain added — you're now ready to set up the design and other settings.
If you're adding a private domain:
- Tap 👤 Private
- Enter the domain name you purchased.
- Copy the provided NS records and paste them into the domain registrar settings.
Example using @FastDomainBot:
- Tap My Domains 📋
- Select the domain you want to link.
- Tap 🔄 Change NS Records.
- Send the NS records provided by our bot during the add process.
Domain added. Wait for the domain to be linked — this usually takes up to one hour.
If the domain remains unlinked for an extended time, contact any team support member.
Installing a Design
To make your site appear when opening the domain, you’ll need to install a land (design) on it.
From the main menu, go to 🌐 Domains —> select the domain to configure —> ✏ Design️.
Regular designs contain no drainer and are used for passing moderation or Red Table.
White designs come with a drainer. Choose these to begin work.
A design selection menu will open. Choose any one you’d like to use.
You can preview all available designs on our Telegram channel "Designs" (🛡 Team Resources)
Uploading a custom design
You can upload your own land if needed.
Go to the main menu and select ❗️Worker Panel —> ⚒️ Custom design
Tap ✏️ Add and enter the name of the landing — this name will be displayed in our bot.
Then tap Preview —> 📝 Change landing. Specify the type: White or Drainer.
If uploading a white land, send a *.zip archive containing your land to the bot. It must include
index.htmland any necessary images/styles.If uploading a drainer land, pay attention to the note — you’ll need to include a specific attribute in your HTML file.
Once uploaded, your private land will only be visible to you among all designs — Installing a Design.
Subdomains
You can create additional domains off your private domain.
These “additional domains” are called subdomains, meaning they include your full private domain name but have unique settings.
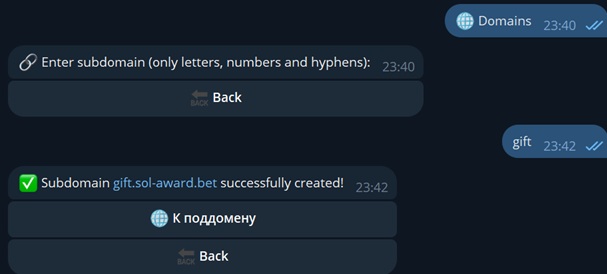
To create a subdomain, open the main menu and go to 🌐 Domains —> select the domain —> 🔡 Subdomains —> ➕ Add Subdomain.
Enter the name of the subdomain (only lowercase English letters, numbers, and hyphens).
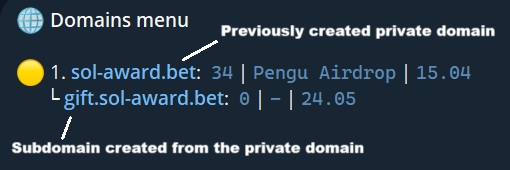
rublevkateam.org is the previously added private domain, and gift is a subdomain created from it.
Now the subdomain will appear in your domain list.
A subdomain can have different settings, a separate land, and more. It behaves like a separate autonomous domain.
Domain Configuration
Drainer Settings
To configure the drainer, go to the main menu: 🌐 Domains —> select the domain —> 💻 Drainer settings
Fake SOL Receive
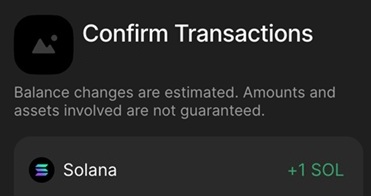
This feature adds a fake transaction showing that a specific amount of Solana has been received.
The fake SOL amount should match the narrative of your land. For example, if your land claims a 10 SOL prize, set the amount to 10 SOL here.
Fake Token Receive
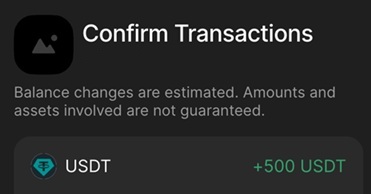
Here you can configure the receipt of a fake token. Fake token receive is a simulated transaction showing receipt of a specified token in a given amount.
Make sure the token type and amount align with your land.
For example, if the land advertises 500 USDT, choose the token “USDT” and enter the amount “500”.
This will result in a contract line like this:
Fake Refund
Here you can enable a fake refund. This feature helps increase user trust.
For every "Send" action, a matching "Receive" will appear visually.
What it looks like when enabled:
SOL and tokens refund enabled.
Phantom Whitelist
If your domain is whitelisted in the Phantom wallet, enabling this feature allows hidden drainer and fake token receipts within it (Phantom Wallet).
🚧 Warning
Only enable this if your domain is truly on the Phantom whitelist.
If not whitelisted, enabling this will make deductions from Phantom wallets impossible.
Alert and Min Amount
To configure alerts and minimum amount, go to: 🌐 Domains —> select the domain —> 🔔 Alert and min Amount
Here you can define a USD threshold at which the drainer requests withdrawal. You can also set an alert message for the victim if their funds are below this limit.
💡 Tip
You can use this tactically: for instance, set the real minimum at $1, but show an alert saying “Minimum 0.1 SOL required.” This may convince a victim with no SOL to purchase more crypto.
Access Settings
This feature limits access to your domain so it only opens inside Telegram Miniapp. It’s useful if your Telegram bot is the landing destination, as it significantly reduces Red Table risks.
Cloaking
ℹ️ What is cloaking?
Cloaking is a feature that restricts access to your domain based on a set of specific user criteria.
With cloaking, you can deny access to users who match certain parameters.
Cloaking filters include: Country, IP Address, ISP, VPN/Proxy.
To configure cloaking, go to: 🌐 Domains —> select the domain —> ⛓️ Cloaking
To set a specific restriction, click the corresponding button and follow the on-screen instructions.
Redirect
Redirect is a feature that automatically sends the victim to another domain when your domain is opened. The redirect is handled via Cloudflare. It’s useful for bypassing blocks or restrictions on the original domain.
To enable redirect, go to: 🌐 Domains —> select the domain —> ↪️ Redirect
Other Settings
Copy Settings
To use this feature, go to the main menu: 🌐 Domains —> select the domain —> ↕️ Copy Settings.
Open the feature on the domain you want to copy from, then select the domain you want to copy to.
Note: All domain settings except design will be transferred.
Notifications
This feature monitors various restrictions and blocks on your working domains. If a domain is sanctioned, you'll receive a Notification from our bot.
To set up notifications, go to the main menu: 🌐 Domains —> select the domain —> 🔔 Notifications.
Red Table Bypass
This feature is designed to help remove Google Red Table restrictions. By using a white land and following bot instructions, there’s a high chance of unblocking the domain. This feature becomes available only after the domain is blocked.
To initiate bypass, go to the main menu: 🌐 Domains —> select the domain —> ⛔️ Red table bypass.
Additional Features
Notification
ℹ️ What is a Notification?
A Notification is an alert about victim interactions with your drainer-powered resource.
To configure Notifications, go to the main menu: 👤 My Profile —> ⚙️ Configure notifications.
Notifications configured here will be sent to you by our bot @RublevkaTeam_bot.
- Visits: the victim has opened your site.
- Connect request: the victim connected their wallet.
- Withdraw request: a contract was sent to the victim.
- Withdraw request cancel: the victim rejected the contract.
- No funds and balance: the wallet has no SOL or assets.
- No funds with balance: the wallet has no SOL to pay for gas but does have tokens and/or NFTs.
- Profits: the victim signed the transaction and assets have been captured.
Some notifications, such as "Visits" and "No funds and balance" cannot be enabled due to Telegram restrictions. These are only available via Custom Notification.
You can also set a minimum balance notification filter — notifications from victims below the set threshold will be ignored.
Custom Notification
To enable "Visits" and "No funds and balance", you’ll need to set up a Custom Notification.
To do so, go to the main menu: ❗️Worker Panel —> ⚙️ Notification.
You’ll need to create a bot. You may use your main Telegram account. For details, see Telegram Bot Guide 🤖.
You don’t need to configure or style the bot. Just create it and copy the TOKEN.
Paste the bot token into the 🤖 Bot.
Write to GetMyIdBot and copy your Telegram ID.
Paste your Telegram ID into the 🆔 Chat.
You may also configure chat notifications. Just add your bot to a chat and copy the chat ID.
Tap Test. If everything is set up correctly, you'll receive a test notification.
Set up custom alerts (❗️Worker Panel —> ⚙️ Notification —> ⚙️ Configure Notifications). These are the alerts your bot will send to the specified chat.
Note: Some features are not supported in Custom Notification.
Profile Transfer
ℹ️ What is this feature?
Profile Transfer is a useful option that lets you migrate your RublevkaTeam profile from one Telegram account to another.
Telegram accounts can be subject to bans or restrictions. That’s why we built this feature.
To begin, go to: 👤 My Profile —> 👤 Transfer Profile.
🚧 Important
Be sure to save the profile transfer code somewhere secure. You’ll need it to complete the transfer.
Go to: 👤 My Profile —> 👤 Transfer Profile —> 📤 Transfer profile from this account.
If you want to transfer the profile to a new Telegram account, log into the new account and go to 👤 My Profile —> 👤 Transfer Profile —> 📥 Transfer profile to this account, then enter your transfer code.
🤕 If your transfer code is lost
If you've lost the code, contact any support team member. You'll need your Telegram ID or Telegram Username and proof of profile ownership.
Blacklist
To access the list, go to ❗️Worker Panel —> ⛔️ Blacklist
This is where you’ll find victims you've blocked in Notification #Connect (Notification).
You can unblock a victim by copying their IP, locating them via #Connect, and tapping ✅Unblock User.